
Stripo.email is an online tool to quickly create professional looking marketing emails. We use Stripo.email to create templates. These templates are sent out by the Laposta tool.
First, why do we use two applications for our newsletters and mailings? Most tools like the well known Mailchimp application are multifunctional, with that we mean they offer two basic functionalities around emailing 1) create a design and 2) they send out the emails for us. Because of this, for example for mailchimp, the sending options are great but design options are very limited. To create a professional design or have maximum flexibilty in design you nede an external tool. Therefor we choose two tools, Stripo.email to create professional templates and have access to a wide variety of prebuild templates, while we use Laposta because its strong in sending and delivering email to our subscribers.
Take the following steps to create and send a marketing email.
- Create your template in Stripo.email
- Export the template to Laposta and send a test maill
- Once approved, send the email from Laposta to a Laposta subscriber list
1. Create your template in Stripo.email #
- logon to Stripo.email
- use an exiting KCI template or use one of the 600+ templates from Stripo
- open the template and make adjustments
2. Export the template to Laposta and send a test mail #
- Open the template in Stripo as you created
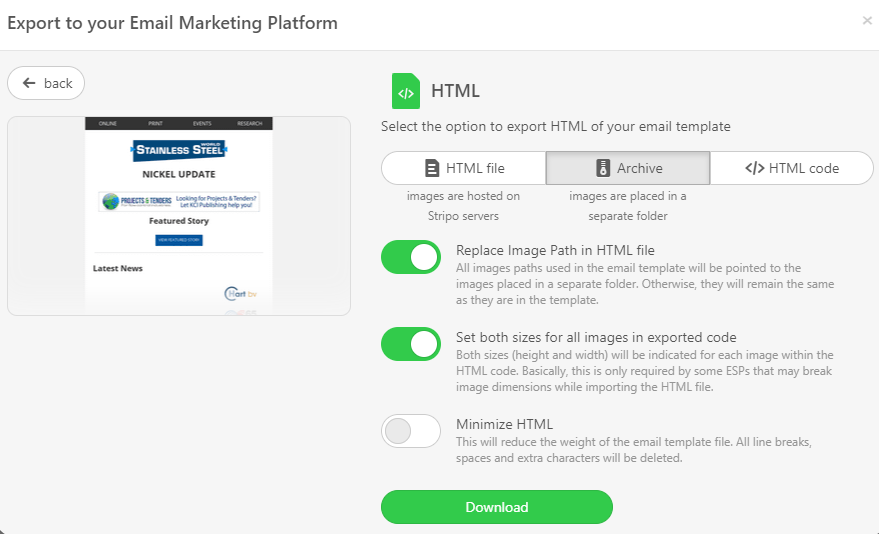
- Click in the top of the screen on Export
- Choose HTML
- Choose Archive and enable the first two options and click download. The template will now be downloaded to your PC
3. Import and send the email from Laposta #
- First, open your downloaded zip file. It consists of two components. One is an HTML file and one is a folder with the newsletter images
- Extract the files in the zipfile in a temporary download folder
- Onze extracted, zip the images folder to a ZIP file. In Windows, rightclick the images folder, select Add to Archive and select ZIP
Now we are able to logon to Laposta, import our template and send our email.
There are several ways to get started with a new email campaign. Find below the steps to get started.
- Logon to Laposta.nl
- Go to Campaigns to get an overview of all campaigns
- Click Create New Campaign
- Select Import and click Start
- Enter the Basic Data like
- Campaign Name: Stainless Steel World.net
- Sender: Stainless Steel World
- Sender Email: select the correct sender email address from the dropdown list
- Reply To: select the correct reply-to email address from the dropdown list
- Enter the Subject
- Click Save and to Step 2
- Select Recipients, select the list with email addressess you want to send the email to. Click Save and to Step 3
- Import Email. Select Import from Computer and Click Start Import. The template will now be imported in Laposta
- In HTML field: select your downloaded HTML file
- In Files field: select your images.zip file
- Select the check box CSS inline
- Click Start Import, if you get the message CSS files missing, click Ignore Warnings and proceed. If you get the message that there’s no unsubscribe option available, you need to add the unsubscribe code to your template in Stripo.email. An unsubscribe option in any newsletter is mandatory.
- The template is now imported in Laposta and you return to the template overview.
Now you can start a new campaign with your imported template.
- Click Start Campaing below the Template preview
- Enter the Basic Data Campaign Name, Sender (name), select Sender Email and Reply To. If your desired sender and sender email name is not available, we need to add this information first. Enter the Subject of the newsletter. Please note that several fields will be shown in the users’ Inbox so make sure the entered information is correct and attractive. Click Save and to Step 2.
- Select the List where you want to send the email too. Always send a test mail before sending out your email. You can use (or create) a test email list first. Click Save and to Step 3.
- Click to select your Template. Then click Save and to Step 4.
- A preview is generated. Please note that this review may look different on your screen then in Outlook or Gmail clients. So make sure you send the email to these two clients and see if everything is displayed correct.
- Click the button Testmail to send a test.
- You now have the option to send a test mail. Click Send.
- If you’re satisfied with your test emails, click To Step 5.
- You know get a complete overview of the mail you are going to send. You can quickly jump to a specific step on the right to make changes.
- If everything is ok, click Confirm and to Step 6 at the bottom of the screen.
- You have two options to send the mail, you can send it directly or schedule the email.
- You can also add an email address so that your are notified when your email is send out.


